

Warning
Edition 3
Legal Notice
- 1. Course skeleton
- 2. Supported Tags
- 3. Building a Student Guide
- 4. Enhancing Your Student Guide with Lists, Tables, and Other Features
- 5. Interacting with the System
- 5.1. URI and URL
- 5.2. Code
- 5.3. User Input
- 5.4. Replaceable User Input
- 5.5. Application Names
- 5.6. Product Names
- 5.7. Identifying System Output
- 5.8. Recommended Practices for Remote Logins
- 5.9. Using Other Operating Systems
- 5.10. Using Shortcuts, Keycombos, and Keycaps
- 5.11. Recommended Practices for Remote Logins
- 6. Representing GUI Objects
- 7. Describing Sets of Data
- 8. Conditional Tagging
- 9. Using ID Attributes
- 10. Other DocBook Elements
- 11. Presentation Methods
- 12. Engagement Methods
- 12.1. Usage Guidelines
- 12.2. Guided Exercise Overview and XML
- 12.3. Sample Guided Exercise
- 12.4. Guided Exercise - Multiple Tasks
- 12.5. Sample Guided Exercise with Multiple Tasks
- 12.6. Resequencing Quiz Overview and XML
- 12.7. Resequence Title
- 12.8. Matching Quiz Overview and XML
- 12.9. Matching Quiz Sample Title
- 12.10. Multiple-choice Overview and XML
- 12.11. Multiple-choice Sample Title
- 12.12. Lab Overview and XML
- 12.13. Creating Widgets with Microtools
- 12.14. Comprehensive Review Overview and XML
- Index
Chapter 1. Course skeleton
Important
1.1. Downloading the Course Skeleton
[user@demo ~] $ git clone git@github.com:RedHatTraining/skeleton.gitskeleton in your current directory. The skeleton contains all required files for building a course, and templates for each different kind of section within a course.
[user@demo skeleton] $ git pull1.2. Building an RHT Course
guides directory of your course and run flamel sg to build the student guide.
Chapter 2. Supported Tags
Note
2.1. List of Supported Tags
Important
| Docbook Element | Definition | Purpose | Purpose Explanation |
|---|---|---|---|
| abstract | A summary | Content UX | Abstracts must be tagged in order to generate styling on the goals and objectives, which give users an at a glance summation of what they will find in a given chapter. |
| answer | An answer to a question posed in a question and answer set | Content UX | Answer options must be clearly marked so that:
|
| appendix | An appendix in a Book or Article | Supplementary Material | Appendices contain more supplementary information than chapters and adhere to different rules. |
| area | Value pointer to an area of an image that is annotated. | Content UX | Allows for a callout list against images |
| areaset | A collection of regions in a graphic example | Structure | Allows for a callout list against images |
| areaspec | Tag used to group multiple area elements | Structure | Allows for a callout list against images |
| author | The name of an individual author | Metadata | Author information allows us to know who is responsible for a work's production. |
| authorgroup | Wrapper for author information when a document has multiple authors or collaborators | Structure | Necessity for Docbook data model for author tagging. |
| blockquote | A quotation set off from the main text | Content UX | Styles quotations so it is clear for the user the differentiation to the regular text. |
| book | A wrapper to contain chapters and appendices. Equivalent to a single course. | Structure | Required to bundle Docbook 4.5 chapters together into a course |
| bookinfo | Meta-information for a Book | Metadata | Information about the course, including course title, number, publish date, product, etc. |
| callout | A “called out” description of a marked area | Content UX | Callouts act as annotation and can be directly linked to portions of an image or screen capture. |
| calloutlist | A list of callouts | Structure | Required to bundle Docbook 4.5 callouts together |
| caption | A brief description of the object. | Content UX | Offers narrative about a media object (figure, screenshot, video, etc) |
| chapter | A topic within a book | Structure | Major topic based piece of content in our structures, made up of sections. |
| citetitle | The title of a cited work | Metadata | The title of a cited work in a reference. |
| co | The location of a callout embedded in text | Content UX | Links callout annotations to particular pieces of information in an image or screenshot. |
| code | An inline code fragment | Content UX | Captures blocks of text that represent code to distinguish this from narrative content. |
| colspec | Specifications for a column in a table | Structure | Used by the OASIS/CALS table model in Docbook to ensure correct table alignment |
| edition | The name or number of an edition of a document | Metadata | Captures information about the edition of a course |
| editor | The name of the editor of a document | Metadata | Editor information allows us to know who is responsible for a work's production. |
| An email address | Metadata | Identifying information for references. | |
| emphasis | Emphasized text | Content UX | Emphasizes and highlights important text to the user. |
| entry | A cell in a table | Structure | Used by the OASIS/CALS table model in Docbook for correct table alignment |
| firstname | The first name of a person | Structure | Required by the Docbook data model to validate <author> tags. |
| firstterm | The first occurrence of a term | Content UX | Identifies the first use of a term. |
| formalpara | A paragraph with a title | Content UX | Only used within tasksummary and taskprerequisites within guided exercises to create structure (due to the limitations of the Docbook data model). Do not use to create general structure in chapters - use nested sections instead. |
| guibutton | The text of a button in a GUI | Context UX | Distinguishes GUI buttons. |
| guiicon | The text of a icon in a GUI | Context UX | Distinguishes GUI icons. |
| guilabel | The text of a label in a GUI | Context UX | Distinguishes GUI labels |
| guimenu | The name of a menu in a GUI | Structure | Distinguishes GUI menus and auto-generates arrows when used within menuchoice |
| guimenuitem | The name of a terminal menu item in a GUI | Structure | Distinguishes GUI menus and auto-generates arrows when used within menuchoice |
| guisubmenu | The name of a submenu in a GUI | Structure | Distinguishes GUI menus and auto-generates arrows when used within menuchoice |
| imagedata | Pointer to external image data | Structure | Required by the Docbook data model to point to image files |
| imageobject | A wrapper for image data and its associated meta-information | Structure | Required by the Docbook data model to use imagedata |
| imageobjectco | A wrapper for an image object with callouts | Structure | Required by the Docbook data model to use imagedata with callouts |
| important | An admonition set off from the text | Content UX | Highlights important content as an aside to the main content for the user. |
| informaltable | A table without a title | Content UX | Used to render tables without titles, as regular tables require them in the Docbook data model. |
| invpartnumber | An inventory part number | Metadata | Captures the value of the course number. |
| itemizedlist | A list in which each entry is marked with a bullet or other dingbat | Content UX | Used to generate standard bullet lists. |
| keycap | The text printed on a key on a keyboard | Structure | Needed by keycombo, autogenerates + signs between key values. |
| keycombo | A combination of input actions | Content UX | Autogenerates a '+' between keycaps. This markup is necessary since it keeps the generated text in the same style as keycap |
| legalnotice | A statement of legal obligations or requirements | Metadata | Explains copyright, trademark, and other legal formalities of a course |
| listitem | A wrapper for the elements of a list item | Structure | Used to identify constituents within a itemizedlist, orderedlist, or variablelist structure |
| mediaobject | A displayed media object (video, audio, image, etc.) | Structure | Wrapper required in Docbook model to use imageobject. Also useful for other media (audio, video) that wouldn't use imageobject. Also allows for 'alternative versioning' of media content where one format works for one output better than another, e.g. video for ROL vs. a screencap image for the PDF. |
| mediaobjectco | A media object that contains callouts | Structure | Follows the same logic as mediaobject, while also allowing for call-outs. |
| member | An item in a simplelist. | Structure | Items in a simplelist. |
| menuchoice | A selection or series of selections from a menu | Content UX | Generates a '→' with special handling for shortcuts. Ensures that the generated text and children elements are styled the same. |
| note | A message set off from the text | Content UX | Allows us to style information that is an aside to the general sections of content. |
| orderedlist | A list in which each entry is marked with a sequentially incremented label | Content UX | Used to generate standard numbered lists. |
| othercredit | A person or entity, other than an author or editor, credited in a document | Metadata | Allows us to know who is responsible for a work's production. |
| package | A package | Content UX | Package names are given special styling (italicization) to distinguish them from other plain text content. |
| para | A paragraph | Content UX | Needed for basic paragraph blocks. |
| phrase | A span of text | Content UX | phrase with a @role='fixedcase' is used very specifically to ensure that regardless of styling, the casing of a word or phrase does not change. |
| preface | Introductory matter preceding the first chapter of a book | Supplementary Material | Prefaces contain more supplementary information that introduces a user to the course and adhere to different rules. |
| procedure | A list of operations to be performed in a well-defined sequence | Structure | Used by the Docbook data model as a wrapper for a set of steps to be completed in a particular order. |
| productname | The formal name of a product | Metadata | Identifies the full product that the course is about in the metadata. QA should ensure this is not used within main chapters in lieu of application |
| productnumber | A number assigned to a product | Metadata | Identifies the course number in the metadata. |
| prompt | A character or string indicating the start of an input field in a computer display | Content UX | Identifies content generated by the computer terminal, rather than a users input within a <screen>. Styling between the two within screen is differentiated so that the user can intuit the information. |
| pubdate | The date of publication of a document | Metadata | Appears in Book_Info.xml and defines the publication date of a course. This is not listed in the Docbook guide. |
| publisher | The publisher of a document | Metadata | Identifies the publisher of the course |
| pubsnumber | A number assigned to a publication other than an ISBN or ISSN or inventory part number | Metadata | |
| qandaentry | A question/answer combination within a QandASet | Structure | Required by the Docbook model to group a question and its answer together |
| qandaset | A set of multiple questions and answer entries | Structure | Required by the Docbook model to group multiple qandaentries together (e.g. multiple questions and answers) |
| question | A question in a QandASet | Content UX | A question in a question and answer set. |
| quote | An inline quotation | Content UX and Translation | This tag is used to generate inline quotation marks for content that the author wants to offset. This tag also makes it simple to translate quotes into different languages, which may use different punctuation. |
| replaceable | Content that may or must be replaced by the user | Content UX | Offsets text that the user should understand is meant to be replaced with values unique to their local machine. |
| row | A row in a table | Structure | Needed in order to organize a table or informaltable according to the data model |
| screen | Text that a user sees or might see on a computer screen | Content UX | A wrapper containing all of the elements a user will see in a terminal / command line screen window |
| section | A recursive section | Structure | Used to group paragraphs together and title them according to topics outlined within the chapter. |
| simplelist | An undecorated short list. | Content UX | This element should be used only for short lists within tables. |
| shortcut | A key combination for an action that is also accessible through a menu | Structure | Very specifically used within menuchoice as a wrapper for keycombo. This is very much a Docbook restriction as keycombo can't be used directly within menuchoice. |
| step | A unit of action in a procedure | Content UX | Outlines steps that a user should take to complete a particular task. |
| stepalternatives | Alternative steps in a procedure | Content UX | Offers alternative methods to complete a step in a given procedure. |
| subscript | A subscript (as in H2O, the molecular formula for water) | Content UX | Stylizes numerals so that they appear correctly in certain circumstances where they are required such as chemical equations or mathematical formula. |
| substeps | A wrapper for steps that occur within steps in a procedure | Structure | Used by the Docbook model to create tiers of steps in a procedure |
| subtitle | The subtitle of a document | Metadata | Distinguishes supplementary title information from the main title. Only allowed within bookinfo |
| superscript | A superscript (as in x2, the mathematical notation for x multiplied by itself) | Content UX | Stylizes numerals so that they appear correctly in certain circumstances where they are required such as chemical equations or mathematical formula. |
| surname | A family name; in western cultures the last name | Structure | Required by the Docbook data model to validate <author> tags. |
| table | A formal table in a document | Content UX | Used to capture titled tables with headed columns |
| task | A task to be completed | Content UX | An activity a student is expected to complete |
| taskprerequisites | The prerequisites for a task | Content UX | Any prerequisites a user should have completed before starting the task. |
| taskrelated | Information related to a task | Content UX | Supplementary information related to the activity. |
| tasksummary | A summary of a task | Content UX | Summarizes the activity for the user |
| tbody | A wrapper for the rows of a table or informal table | Structure | Required by the data model to distinguish the body rows of a table from the header and the footer |
| term | The word or phrase being defined or described in a variable list | Content UX | 'Heading' in a variable list. Usually the term has distinct styling applied. |
| textobject | A wrapper for a text description of an object and its associated meta-information | Accessibility | Used specifically to cover alt text content on an image. |
| tfoot | A table footer consisting of one or more rows | Structure | Required by the data model to distinguish table footers from other table content. |
| tgroup | A wrapper for the main content of a table, or part of a table | Structure | Allows tables to be divided into sections. |
| thead | A table header consisting of one or more rows | Structure | Required by the data model to distinguish column headings in a table. |
| title | The text of the title of a section of a document or of a formal block-level element | Content UX | Identifies the title of content - in a chapter, section, table, etc so that the user can identify portions of content. |
| trademark | A trademark | Compliance | Autogenerates the trademark symbol where relevant |
| ulink | A link that addresses its target by means of a URL (Uniform Resource Locator) | Content UX | Allows a user to jump to other relevant external resources |
| uri | A Uniform Resource Identifier | Content UX | Used to create pseudo links that we would never want the user to click but want to appear as a link. These dead links serve a purpose to the example but do not represent content we want to direct a user to. |
| userinput | Content that must be entered, and possibly changed, by a user. | Quality Assurance and Scripting | Improves quality by testing values in scripts such as pre-commit or automated lab testing. |
| variablelist | A list in which each entry is composed of a set of one or more terms and an associated description | Content UX | A headed list, where the 'heading' and following information are tied to each other. Very specifically used to cover 'glossary-like' content |
| varlistentry | A wrapper for a set of terms and the associated description in a variable list | Structure | Used to group a term and its definition in a headed list. |
| videodata | Pointer to external video data | Content UX | Required by the Docbook data model to point to video files |
| videoobject | A wrapper for video data and its associated meta-information | Structure | Required by the Docbook data model to use videodata |
| warning | An admonition set off from the text | Content UX | Cautions the user with a graphic and style as an aside to the main content. |
| xi:fallback | A default string of text when xi:include fails. | Structure | Ensures that xi:includes can not fully fail and that some text is displayed to the user. |
| xi:include | A pointer element to pull in referenced pieces of content. | Structure | Transcludes other XML documents into each other. |
| xref | A cross reference to another chunk. | Content UX | Allows users to jump to other, relevant parts of a course. |
2.2. Unsupported Tags
| Docbook Element | Explanation |
|---|---|
| application | Use code instead. |
| beginpage | Do not use this element - disrupts autogeneration in FOP |
| bridgehead | Use nested sections instead. |
| caution | Unnecessary admonition levels. Use important or warning instead. |
| classname | Use code instead. |
| command | Use code instead. |
| computeroutput | Use code instead. |
| coref | Use arearef instead. |
| entrytbl | FOP does not support nested tables. |
| envar | Use code instead. |
| filename | Use code instead. |
| glossdiv | Glossaries are not currently in use in GLS titles. |
| glosslist | Glossaries are not currently in use in GLS titles. |
| highlights | Use emphasis instead. |
| informalfigure | This tag specifically causes render issues in ROLE and should be removed when old versions are re-worked. |
| inlinegraphic | Does not support text alternative to allow accessibility to the visually impaired. (Breaches US "Section 508" standards.) |
| inlinemediaobject | Use mediaobject instead. |
| keycode | Use keycap instead. |
| keysym | Use keycap instead. |
| link | Redundant to ulink. |
| literal | Use code instead. |
| literallayout | Use screen instead. |
| olink | Use ulink instead. This tag is not only unsupported, it is prohibited - using olink will prevent the book from building. |
| option | Use code instead. |
| parameter | Use code instead. |
| programlisting | Use screen instead. |
| systemitem | Use code instead. |
| tip | Unnecessary admonition levels. Use note instead. |
| varname | Use code instead. |
Chapter 3. Building a Student Guide
3.1. Adding Chapters
- One <title> element, rendered as the chapter title.Depending on the stylesheet, some titles may be converted to uppercase. If your title contains a word or phrase that must not be changed (for example, a trademark with specific case requirements), wrap the phrase in <phrase role="fixedcase">.
- One <abstract> element, rendered as the chapter introduction. This includes a table.
- A list of <xi:include> elements listing section content contained in separate XML files in the
topicsdirectory.
topics directory. Section content is assembled in XML chapter files contained in the sg-chapter directory.
zzz-chapter-template.xml file, included in the https://github.com/RedHatTraining/skeleton repository.
Note
topics directory:
<!-- Include section content from topics directory -->
    <xi:include xmlns:xi="http://www.w3.org/2001/XInclude" href="topics/SG-Sample-ContentSection.xml"/>
    <xi:include xmlns:xi="http://www.w3.org/2001/XInclude" href="topics/SG-Sample-PracticeSection.xml"/>
    <xi:include xmlns:xi="http://www.w3.org/2001/XInclude" href="topics/SG-Sample-Lab.xml"/>
</chapter>3.2. Adding Sections
- Title
- Objective
- Presentation methods
- References
topics/zzz/zzz-content-template.xml file in the https://github.com/RedHatTraining/skeleton repository.
File Naming Conventions
topics/chapter directory. This is illustrated in XML File Naming.
- Do not use numbers.
- Do not use spaces or punctuation. Use dashes as separators, not underscores.
- Always use lowercase.
- The chapter and section names should be short, logical, single words that clearly identify the title.
- Avoid file names and commands. Focus on the task at hand and introduce any files and commands in the text.
Example File Names
- sg-chapters/linuxnet.xml
- sg-chapters/topics/linuxnet/clusters-lecture.xml
- sg-chapters/topics/linuxnet/clusters-practice.xml
- sg-chapters/topics/linuxnet/review.xml
- sg-chapters/topics/linuxnet/summary.xml
- lab linuxnet-clusters subcommand (guided exercise)
- lab linuxnet-review subcommand (end of chapter lab)
- http://materials.example.com/linuxnet/clusters/file
- Syntax: COURSE-linuxnet-clusters-FLAST-YYYYMM
- Syntax: CHAPTER-SECTION[-TYPE]
- linuxnet-clusters-lecture
- linuxnet-clusters-practice
- linuxnet-review
- linuxnet-summary
- linuxnet-clusters-video1
- linuxnet-clusters-multi1
- linuxnet-clusters-reseq1
- images/linuxnet/clusters-TOPIC.png
- images/linuxnet/clusters-TOPIC.svg
- ig-chapters/linuxnet-ig.xml
Presentation section XML
3.3. Adding Titles
Note
3.4. Adding Tasks
- <taskprerequisites>The taskprerequisites render as a "Before you begin" section. The initial paras or other content before the Instructions section is for any script the student must run or other minor prereqs to prepare their systems before starting on the instructions. These are for things specific to the setup that the student is NOT reviewing as part of the exercise and should be minimal.
- <taskrelated>The taskrelated section contains any final information relevant to the exercise. In particular for labs and comprehensive reviews, the Evaluation formalpara within taskrelated should tell the students how to evaluate the success of their work, either through manual checks or a grading script. The Finish formalpara within taskrelated concludes the activity.
- <tasksummary>The initial para is a one sentence statement of the goal of this particular exercise or lab. The Outcomes formalpara will list the specific results the student should achieve.
- <step>
- <substeps>
- <stepalternatives>
- <procedure>
- <qandaset>
- <qandaentry>
- <question>
- <answer>
Important
3.5. Adding Media
3.5.1. Marking up Graphics
<mediaobject id="topic-shortname">
  <imageobject>
    <imagedata fileref="images/memory-tlb-flowchart.svg" [width=""] scalefit="1" align="center"/>
  </imageobject>
  <textobject>
    <phrase>Translation buffer flowchart</phrase>
  </textobject>
  <caption>Translation buffer flowchart</caption>
</mediaobject>- The
idattribute, if used, allows for cross-referring to mediaobjects. - The
widthattribute, if used, is measured as a percentage of the page body (the part of the page that contains text, less margins and the running header/footer). The default width is set to 100% if no width is provided. - The
scalefit="1"attribute causes the height to be proportionally adjusted to match the width. - The <textobject> element renders as an <alt> element and should be included for ADA accessibility.
- The
alignattribute is optional. If omitted, the style sheet defaults toalign="left". - The <caption> element is optional unless you need to refer to the graphic by title, or if they are not suitably explained by the surrounding text.
Important
scale="x" attribute of <imagedata>, or you will get rendering issues in HTML output (ROLE).
Note
Note
3.5.2. Marking up Motion Graphics and Videos
<mediaobject id="topic-shortname-value">
  <videoobject>
    <videodata align="center" fileref="jwplayer:xRthnc134sk" xml:base="videos/deploy/deploy-arch.mp4"/>
  </videoobject>
  <textobject>Pods running on OpenShift</textobject>
  <caption>Pods running on OpenShift</caption>
</mediaobject>3.5.3. Cross-referring to Media
- Ensure that the <mediaobject> element contains a unique @id value. If one does not yet exist, add it, and ensure that it is a unique value.
- Use an <xref> element to create a cross-reference to the <mediaobject> element.
- Make sure the targets have a title or suitable link text or the link will be created as "?"
- Do not reference items inside solutions.
3.6. Adding a Summary
Note
topics/zzz/zzz-summary-template.xml file in the https://github.com/RedHatTraining/skeleton repository.
Important
3.7. Adding an Appendix
- Appendixes do not include abstracts.
- Appendixes do not include sections. If you need a section, add another appendix.
- Appendixes use a DOCTYPE of appendix, rather than chapter, in the header.
Note
topics/zzz/zzz-appendix-template.xml file in the https://github.com/RedHatTraining/skeleton repository.
Chapter 4. Enhancing Your Student Guide with Lists, Tables, and Other Features
4.1. Using Lists
- Itemized lists
- These appear as a bullet list. Use this list type for three or more entries where order is not important, or in a demonstration section when students are encouraged to not perform steps but to watch the instructor instead. Titles are optional.
- Ordered lists
- These appear as a numbered list. Use this list type for multiple entries where order is important, for example, listing the order of operations required to prepare for an installation, or listing a sequence of events that occurs. Titles are optional.
- Variable lists
- These appear as a list of terms followed by definitions. Use this list type to list and describe a series of terms, such as variables, command options or arguments, and similar items. Titles are optional. (This list is written as a variable list.)A variable list is often preferable to a table, because tables have the additional overhead of calculating column width for every translation. Tables are best reserved for information that relies upon, or benefits greatly from, a grid layout.
- Procedures
- These appear as a list of numbered steps. Procedures always include a title, and are used to list the steps required to achieve a task.
- Simple lists
- These appear as undecorated lists of words or phrases, and can appear in either serial, horizontal, or vertical form. Use the
columnsattribute to specify the number of horizontal or vertical columns. The default is a single-column vertical list. Use this type of list in table cells where you need to provide a list but do not want or need bullets or other decorations.Simple lists are only supported inside tables in the RHT DocBook model.
Note
topics/zzz/zzz-chapter-template.xml file and the layout of a smaple procedure is provided in the topics/zzz/zzz-exercise-template.xml file in the https://github.com/RedHatTraining/skeleton repository.
<variablelist><title>Example Variable List</title>
    <varlistentry>
        <term>Example term</term>
        <listitem>
            <para>
                Example definition.
            </para>
        </listitem>
    </varlistentry>
    <varlistentry>
        <term>Another term</term>
        <listitem>
            <para>
                Another definition.
            </para>
        </listitem>
    </varlistentry>
</variablelist>Example Variable List
- Example term
- Example definition.
- Another term
- Another definition.
4.2. Using Tables
Important
colnum and colname). You can use the colwidth attribute to adjust the relative width of columns to suit your data.
<table frame="all">
  <title>Example of a Basic Table</title>
  <tgroup cols="3" align="left" colsep="1" rowsep="1">
    <colspec colname="c1" colnum="1" colwidth="1.0*"/>
    <colspec colname="c2" colnum="2" colwidth="2.0*"/>
    <colspec colname="c3" colnum="3" colwidth="2.0*"/>
    <thead>
      <row>
        <entry>Header 1</entry>
        <entry>Header 2</entry>
        <entry>Header 3</entry>
      </row>
    </thead>

    <tbody>
      <row>
        <entry>b1</entry>
        <entry>b2</entry>
        <entry>b3</entry>
      </row>
      <row>
        <entry>c1</entry>
        <entry>c2</entry>
        <entry>c3</entry>
      </row>
      <row>
        <entry>d1</entry>
        <entry>d2</entry>
        <entry>d3</entry>
      </row>
    </tbody>
  </tgroup>
</table>
<table frame="all">
  <title>Example of a Complex Table</title>
  <tgroup cols="5" align="left" colsep="1" rowsep="1">
    <colspec colname="c1" colnum="1" colwidth="1.0*"/>
    <colspec colname="c2" colnum="2" colwidth="2.0*"/>
    <colspec colname="c3" colnum="3" colwidth="2.0*"/>
    <colspec colname="c5" colnum="5"/>
    <thead>
      <row>
        <entry namest="c1" nameend="c2" align="center">Horizontal header span</entry>
        <entry>Header 3</entry>
        <entry>Header 4</entry>
        <entry>Header 5</entry>
      </row>
    </thead>

    <tbody>
      <row>
        <entry>a1</entry>
        <entry>a2</entry>
        <entry>a3</entry>
        <entry>a4</entry>
        <entry morerows="1" valign="middle">
          <para>
            Vertical span across two rows.
          </para>
        </entry>
      </row>
      <row>
        <entry>b1</entry>
        <entry namest="c2" nameend="c3" align="center" morerows="1" valign="bottom">
          Span two rows and two columns.
        </entry>
        <entry>b4</entry>
      </row>
      <row>
        <entry>c1</entry>
        <entry>c4</entry>
        <entry>c5</entry>
      </row>
    </tbody>
  </tgroup>
</table>Table 4.2. Example of a Complex Table
| Horizontal header span | Header 3 | Header 4 | Header 5 | |
|---|---|---|---|---|
| a1 | a2 | a3 | a4 |
Vertical span across two rows.
|
| b1 | Span two rows and two columns. | b4 | ||
| c1 | c4 | c5 | ||
namest and nameend attributes on the <entry> elements.
4.3. Using Admonitions
- Emphasize a specific point
- Isolate a comment that may be useful in passing to some students
- Draw attention to critical information
Important
Table 4.3. Primary Admonition Elements
| Element | Purpose |
|---|---|
<note> | An item of interest, but not critical information. Best practices, comparisons, supplementary information, or other guidance that if ignored may be inconvenient but not problematic. Should be the most common admonition. |
<important> | Details things that are important to the student, which may cause confusion, frustration, or irritation if ignored, but will not cause data loss or permanent damage. |
<warning> | Critical information that if ignored could lead to data loss, permanent damage, or other major problems. Use sparingly. |
Note
BestPractices attribute. Convert any existing instances to a Note, Important, or Warning admonition. If required, you can indicate that you are discussing a recommended practice as part of the admonition.
4.4. Using Callouts and Callout Lists
<screen>[user01@host ~]$ cd /etc/yum.repos.d <co id="yum.co" linkends="a"/>
[user01@host yum.repos.d]$ ls
dropbox.repo  fedora.repo  fedora-updates.repo  fedora-updates-testing.repo</screen>

<calloutlist>
    <callout id="a" arearefs="yum.co" >
        <para>This command moves you to the /etc/yum.repos.d directory.</para>
    </callout>
</calloutlist>[user01@host ~]$ cd /etc/yum.repos.d  [user01@host yum.repos.d]$ ls
dropbox.repo fedora.repo fedora-updates.repo fedora-updates-testing.repo
[user01@host yum.repos.d]$ ls
dropbox.repo fedora.repo fedora-updates.repo fedora-updates-testing.repo
This command moves you to the /etc/yum.repos.d directory.
|
Note
4.5. Emphasizing Text
<emphasis>italic</emphasis>
<emphasis role="bold">bold</emphasis>
<emphasis role="bold"><code>emphasized code text</code></emphasis>
- italic
- bold
emphasized code text
4.6. Using References
role attribute on <note> admonitions to collect information about useful references for further information on a topic. These are used primarily at the end of a section in Red Hat courses. References require particular XML tagging patterns so that they are consistent from section to section and unit to unit.
Important
Examples of References
zzz-content-template.xml file, included in the https://github.com/RedHatTraining/skeleton/blob/master/guides/en-US/sg-chapters/topics/zzz/zzz-content-template.xml repository.
Red Hat Documentation Reference
html-single version of any documentation.
zzz-content-template.xml file, included in the https://github.com/RedHatTraining/skeleton/blob/master/guides/en-US/sg-chapters/topics/zzz/zzz-content-template.xml repository.
<note role="References">
<para>
For more information, refer to the <citetitle>Graphical Installation</citetitle>, <citetitle>Remote Installation</citetitle>, and <citetitle>Automated Installation </citetitle> sections in the <citetitle>Red Hat Enterprise Linux 7 Installation Guide</citetitle> at <ulink url="https://access.redhat.com/documentation/en-us/red_hat_enterprise_linux/7/html-single/installation_guide/index#chap-getting-started"/>
</para>
</note>
Note
Combining Multiple Reference Types
- Yelp (rare)
- Local Documentation (rare)
<note role="References">
      <para>
        <code>info libc</code> (<citetitle>GNU C Library Reference Manual</citetitle>) <itemizedlist>
          <listitem>
            <para>Section 29.2: The Persona of a Process</para>
          </listitem>
        </itemizedlist>
      </para>
      </note>
Note
info libc (GNU C Library Reference Manual)
- Section 29.2: The Persona of a Process
<note role="References">
      <para>
        <code>info libc 'file name resolution'</code> (<citetitle>GNU C Library Reference Manual</citetitle>) <itemizedlist>
          <listitem>
            <para>Section 11.2.2: File name resolution</para>
          </listitem>
        </itemizedlist>
      </para>
      </note>
Note
info libc 'file name resolution' (GNU C Library Reference Manual)
- Section 11.2.2: File name resolution
<note role="References">
      <para>
        <code>ls</code>(1), <code>mv</code>(1), and <code>su</code>(1) man pages
      </para>
      </note>
Note
ls(1), mv(1), and su(1) man pages
/usr/share/help/C in the gnome-help directory. Look for the XML files (*.page). Doing a grep -R for the title is easiest.
<note role="References">
      <para> GNOME Help: <emphasis>Getting Started with GNOME</emphasis>
        <itemizedlist>
          <listitem>
            <para>
              <code>yelp help:gnome-help/getting-started</code>
            </para>
          </listitem>
        </itemizedlist>
      </para>
      </note>
Note
yelp help:gnome-help/getting-started
<note role="References">
      <para> Vinagre Help <itemizedlist>
          <listitem>
            <para>
              <code>yelp help:vinagre</code>
            </para>
          </listitem>
        </itemizedlist>
      </para>
      </note>
Note
yelp help:vinagre
<note role="References">
      <para>
        <ulink url="http://localhost:631/help/">CUPS Online Help</ulink>
      </para>
      </note>
Note
<note role="References">
<para>
<ulink url="https://access.redhat.com/site/solutions/253273"> Knowledgebase: "How to register and subscribe a system using Red Hat Subscription Manager" </ulink>
</para>
</note>url attribute to work around this issue.
<note role="References">
      <para>
        <ulink url="http://www.rfc-editor.org/rfcs/rfc2460.txt"> RFC 2460: Internet Protocol,
          Version 6 (IPv6) Specification</ulink>
      </para>
      <para>
        <ulink url="http://www.ntp.org/">NTP: Network Time Protocol</ulink>
      </para>
      <para>
        <ulink url="http://www.pool.ntp.org/en/use.html">NTP Pool Project: How do I use
          pool.ntp.org?</ulink>
      </para>
      </note>
Note
Referencing Other Sections and Chapters
Chapter 5. Interacting with the System
- 5.1. URI and URL
- 5.2. Code
- 5.3. User Input
- 5.4. Replaceable User Input
- 5.5. Application Names
- 5.6. Product Names
- 5.7. Identifying System Output
- 5.8. Recommended Practices for Remote Logins
- 5.9. Using Other Operating Systems
- 5.10. Using Shortcuts, Keycombos, and Keycaps
- 5.11. Recommended Practices for Remote Logins
5.1. URI and URL
<uri>http://samplelink.com</uri>
http://samplelink.com
<note role="References">
  <para>
    <ulink url="http://localhost:631/help/">CUPS Online Help</ulink>
  </para>
</note>
Note
5.2. Code
<code>public class Plane</code>
public class Plane
<para>
  Use the following query to retrieve the required information:
</para>
<para>
  <code>SELECT student_name, subject1 FROM marks WHERE subject1 > AVG(subject1);</code>
</para>
SELECT student_name, subject1 FROM marks WHERE subject1 > AVG(subject1);
Warning
- Highlighting Output
- The <code> element is also used in <screen> and similar elements to highlight various parts of displayed output. Notice its use in the following example:
<screen>[user01@host]$ cd /etc/yum.repos.d
[user01@host yum.repos.d]$ ls
dropbox.repo  fedora.repo  <code>fedora-updates.repo</code>  fedora-updates-testing.repo</screen>
The above example displays as follows:[user01@host]$ cd /etc/yum.repos.d [user01@host yum.repos.d]$ ls dropbox.repo fedora.repo
fedora-updates.repofedora-updates-testing.repoNote
If the output that you want to highlight is extensive or diverse, requires a description or further identification, consider using a calloutlist instead.
- Syntax
- Use the
VARIABLENAME=valuesyntax to assign values to variables. - Editing Configuration Files
- Remove the
extension>entry and its correspondingsubsystem>section from the configuration file. - Filenames and Directories
- Switch directories to
/etc/init.d/functions. - Namespaces
- The other objects belong to the
systemor theflowersnamespaces. - Registries
- Log in to the OpenShift cluster, and then inspect the resources from the OpenShift internal registry and its operator in the
openshift-image-registryproject. - Roles
- Create a data role called
eu-customersand map it to theeurole. - Modules
- Add the
pam_tty_audit.soPAM module to the relevant configurations. - Classes
- Typical classes might include
hdd,ssd, ornvme. - Commands
- This includes compound commands, commands that consist of a parent or root command, and subcommands
java -versionhammer user create --login user_name - Shell Scripts
- The
one.shscript produces the wordonewhen executed. To change its output totwo, openone.shin a text editor, and changeonetotwo. - Privileges (Root Command)
$ssh student@remote-host ;sudo -i- Terminal and pseudoterminal names
- Review
tty2,tty3,pts/0, etc. - System Calls and Functions
- The
getcwdsystem call returns the current working directory to the application, and thenwritedisplays it to the screen. - Options and Arguments
- Use the
-loption to display a long directory listing. - Parameters
- The standalone domain should be started as usual with an additional parameter, the
jboss.node.nameparameter, as well as providing the bind address. - Literals
- Create a new API manually. Use
Echo APIandecho_apias the new API name and system name respectively. - Variables
- Create two variables named
SYSTEM_ACCESS_KEYandSYSTEM_SECRET_KEY. - Permissions
- All unprivileged users will have a umask setting that causes new files to have a permission of
-rw-rw----and directories to have a permission ofdrwxrwx---. - Boolean Values
- Set the
use_nfs_home_dirsSELinux Boolean to 'true'. - Error Codes / Status Codes
- On the Headers tab, verify that the Status Code is
200 OK. - Kernel and Related Capabilities
- This behavior is configured by the
crashkernel=autosetting. - Endpoints
- When the reply from the
hola-chainedendpoint is immediate you know that the circuit is open and the fallback is invoked immediately. - Examples
- Set the user's email address to
user@example.com.
Note
5.3. User Input
Important
Example 5.1. Identifying User Input
<screen>[user01@host ~]$ <userinput>cd /etc/yum.repos.d</userinput>
[user01@host yum.repos.d]$ <code>ls</code>
dropbox.repo  fedora.repo  fedora-updates.repo  fedora-updates-testing.repo</screen>
[user01@host ~]$cd /etc/yum.repos.d[user01@host yum.repos.d]$lsdropbox.repo fedora.repo fedora-updates.repo fedora-updates-testing.repo
5.4. Replaceable User Input
Example 5.2. Identifying Replaceable Input
<screen>[user01@station10 ~]$ <code>ping station<replaceable>X</replaceable></code>
PING station10 (10.1.1.61) 56(84) bytes of data.
64 bytes from station10 (10.1.1.61): icmp_seq=1 ttl=64 time=0.082 ms
64 bytes from station10 (10.1.1.61): icmp_seq=2 ttl=64 time=0.086 ms
^C
--- station10 ping statistics ---
2 packets transmitted, 2 received, 0% packet loss, time 15ms
rtt min/avg/max/mdev = 0.082/0.084/0.086/0.002 ms</screen>
[user01@station10 ~]$ ping stationX
PING station10 (10.1.1.61) 56(84) bytes of data.
64 bytes from station10 (10.1.1.61): icmp_seq=1 ttl=64 time=0.082 ms
64 bytes from station10 (10.1.1.61): icmp_seq=2 ttl=64 time=0.086 ms
^C
--- station10 ping statistics ---
2 packets transmitted, 2 received, 0% packet loss, time 15ms
rtt min/avg/max/mdev = 0.082/0.084/0.086/0.002 msPATH variable for Bash:
<replaceable>/usr/bin:/usr/local/bin</replaceable>
<replaceable>local.share.lua</replaceable>
5.5. Application Names
name field in a .desktop file. Also use the <code> element for the literal executable name of an application that either has no .desktop file, or for which a .desktop file would be unreasonable, or when you are specifically referring to a command.
<para>
  The <code>FFmpeg</code> project does not provide a desktop launcher or a GUI.
  To convert the footage for this exercise, open a terminal and type <code>ffmpeg -i slug.mp2 slug.mp4</code>.
  It is standard industry protocol that while <code>FFmpeg</code> is running, you are expected to go get a cup of coffee whilst loudly declaring to your coworkers that your work is rendering.
</para>
5.6. Product Names
Note
5.7. Identifying System Output
Note
<prompt>[user01@host ~] $ </prompt><userinput>cd /etc/yum.repos.d</userinput>
<prompt>[user01@host yum.repos.d] $ </prompt><userinput>ls</userinput>
dropbox.repo  fedora.repo  fedora-updates.repo  fedora-updates-testing.repo
[user01@host ~] $cd /etc/yum.repos.d[user01@host yum.repos.d] $lsdropbox.repo fedora.repo fedora-updates.repo fedora-updates-testing.repo
[user@host ~]$oc process mysql-persistent -n openshift \>-v MYSQL_USER=dev -v MYSQL_PASSWORD=$P4SSD -v MYSQL_DATABASE=bank \>-v VOLUME_CAPACITY=10Gi | oc create -f -
  [user01@host]$ awk 'BEGIN { FS="=" } /UUID/ { print $2 }' /etc/fstab
  98d0ce6b-c381-4902-b713-3e49f5465ef4 /boot                   ext4    defaults        1 2
  4f5465ef-c381-4902-b713-74d0de6b2e1  /var                    ext4    defaults        1 2
  [user01@host]$ awk 'BEGIN { FS="=" } /UUID/ { print $2 }' /etc/fstab
  98d0...5ef4 /boot  ext4   defaults  1 2
  4f54...b2e1 /var   ext4   defaults  1 2
5.8. Recommended Practices for Remote Logins
sudo or su - to escalate their privileges. This encourages students to adopt best practices by helping to circumvent several audit and security concerns:
- Logging in as root leaves no trail of who actually logged in to make changes. The system only records that the root user logged in. If you log in as an unprivileged user and escalate your privileges then the system records who logged in and may log that information elsewhere.
- The SSH port is routinely scanned by attackers and passwords attempted on that port. If root logins are allowed, then it is possible for someone to get that password and use it to log in as root directly. It is a faster route to compromise, and is also a known account to probe.
- If users require
sudoto escalate to root then they do not need to know the actual root user password, only their own. There are trade-offs with this approach but thesudoconfiguration can limit what they can run. - It is easier to drop privileges (back to the user account) when you no longer need them; you do not need to log out.
5.9. Using Other Operating Systems
Mount the ISO file in <code><replaceable>/path/to/iso/file</replaceable></code>.
Mount the ISO file in <code><replaceable>C:\path\to\iso\file</replaceable></code>.
cmd.exe). In these cases, you need to use the associated command prompts, line break, and line continuation characters.
cmd.exe as the default shell, and not the PowerShell equivalent. However, the basic rule for prompts and userinput in a screen showing a computer terminal session is to duplicate what students see. The Bash shell uses the backslash character (\) and the greater-than symbol (>) to indicate line breaks and line continuation, respectively. The Windows command shell uses the caret symbol (^) and "More?" for the same purpose. Construct your examples to take these and any other differences into account.
cmd.exe on Windows. An approximate rendition of each is shown below the DocBook markup:
Example 5.3. Wrapping Long Commands in Bash
<prompt>[user@host ~] $ </prompt><userinput>traceroute -m 100 -w 2000 \</userinput> <prompt>> </prompt><code>www.google.com</userinput>
[user@host ~] $traceroute -m 100 -w 2000 \>www.google.com
Example 5.4. Wrapping Long Commands in Microsoft Windows
<prompt>c:\Users\user01></prompt><userinput>tracert -h 100 -w 2000 ^</userinput> <prompt>More? </prompt><code>www.google.com</code>
c:\Users\user01>tracert -h 100 -w 2000 ^More?www.google.com
5.10. Using Shortcuts, Keycombos, and Keycaps
<menuchoice>
  <shortcut>
    <keycombo>
      <keycap>Ctrl</keycap>
      <keycap>N</keycap>
    </keycombo>
  </shortcut>
  <guimenu>GLSPublican</guimenu>
  <guisubmenu>Link</guisubmenu>
  <guimenuitem>Insert URI</guimenuitem>
</menuchoice>.5.11. Recommended Practices for Remote Logins
sudo or su -i to escalate privileges as required. For example:
sudo or su - to escalate their privileges. This encourages students to adopt best practices by helping to circumvent several audit and security concerns:
- Logging in as root leaves no trail of who actually logged in to make changes. The system only records that the root user logged in. If you log in as an unprivileged user and escalate your privileges then the system records who logged in and may log that information elsewhere.
- The SSH port is routinely scanned by attackers and passwords attempted on that port. If root logins are allowed, then it is possible for someone to get that password and use it to log in as root directly. It is a faster route to compromise, and is also a known account to probe.
- If users require
sudoto escalate to root then they do not need to know the actual root user password, only their own. There are tradeoffs with this approach but thesudoconfiguration can limit what they can run. - It is easier to drop privileges (back to the user account) when you no longer need them; you do not need to log out.
Note
Chapter 6. Representing GUI Objects
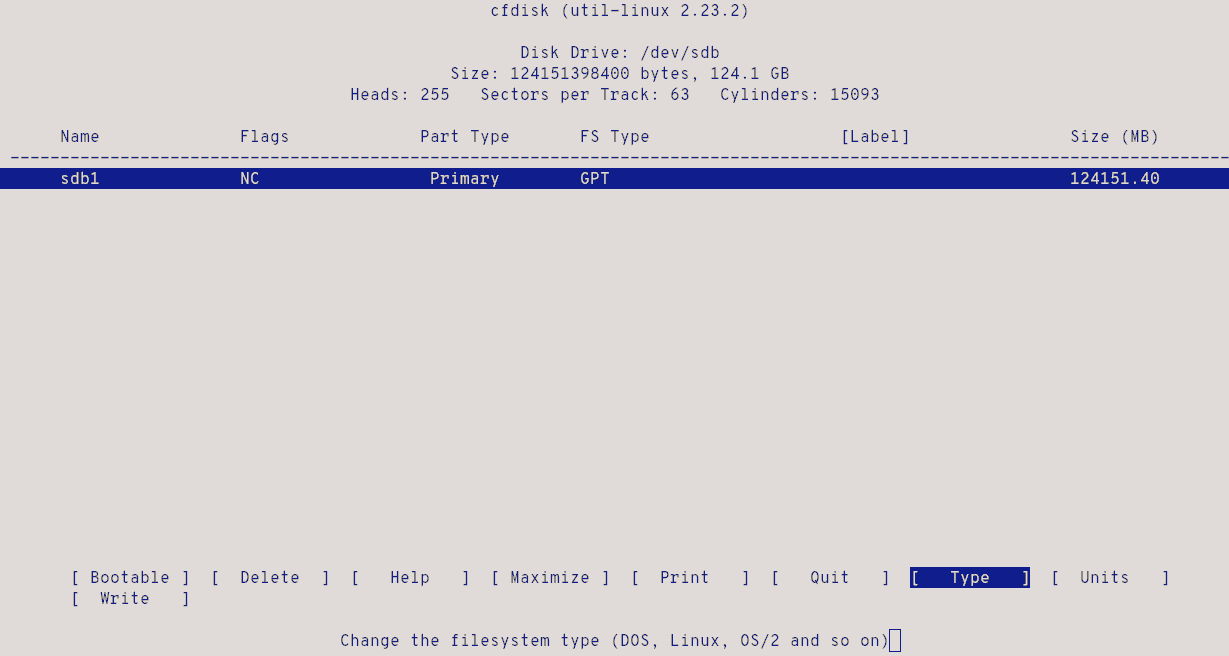
6.1. Comparing Graphical, Terminal, and Browser-based User Interfaces
6.2. Referring to Menus and Submenus
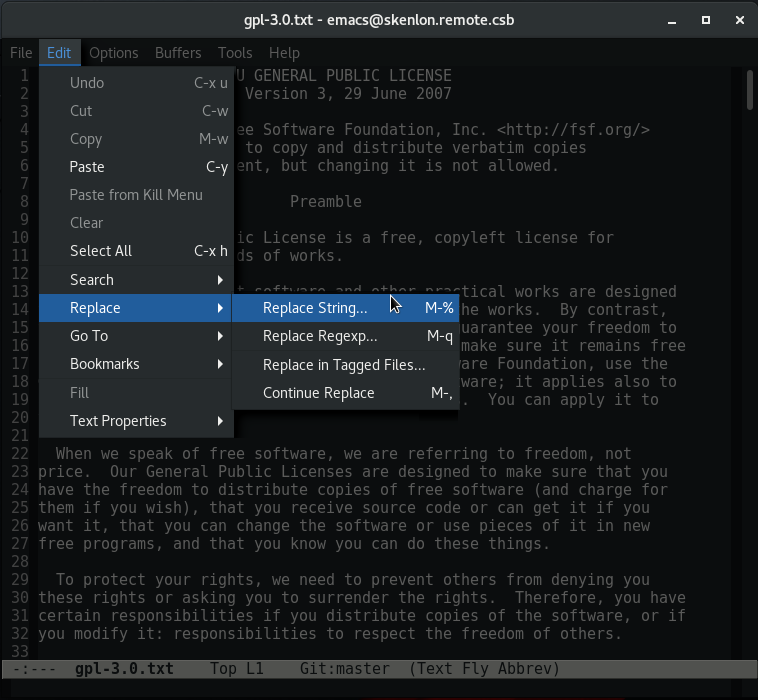
<menuchoice>
  <guimenu>Edit</guimenu>
  <guisubmenu>Replace</guisubmenu>
  <guimenuitem>Replace String</guimenuitem>
</menuchoice>
Note
- The <menuchoice> element automatically inserts the navigation indicators (→). You do not need to enter them manually.
- The manual line breaks in the Docbook markup are recommended for readability. They do not affect the actual render.
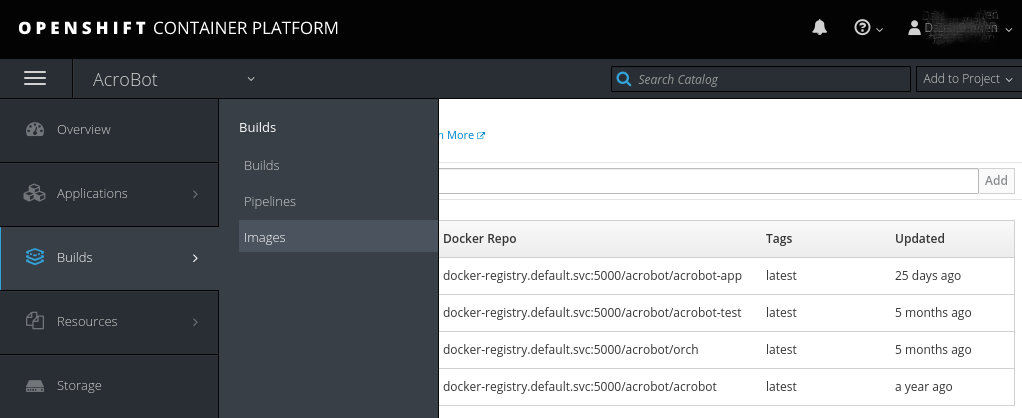
<para> In the Red Hat OpenShift Container Platform (RHOCP) web UI, click <menuchoice> <guimenu>Builds</guimenu> <guimenuitem>Images</guimenuitem> </menuchoice> to display the <guilabel>Image Streams</guilabel> page. </para>
6.3. Referring to UI Labels, Fields, and Buttons
Chapter 7. Describing Sets of Data
7.1. Configuration Files
In the configuration file, set the value of <code>rsync</code> to <code>True</code>.
In the configuration file, create a new section named <code>[Hosts]</code>.
Note
Create a new YAML file and enter <code>pre-commit:</code> as the initial value.
Under <code>pre-commit:</code>, add <code>checkout: true</code>.
7.2. Databases
Join the content of the first record, <code>GNU</code>, with the content of the second record, <code>Linux</code>, to complete the project.
Chapter 8. Conditional Tagging
8.1. Conditional tagging
condition="ilt" attribute to an element ensures that only that element and its children are rendered in an ILT build. The same applies for the condition="role" attribute and ROLE builds. Any text referring to instructors should appear only in ILT, not ROLE. An example is the element we use for videos (see the media section). The following example applies to labs:
<task condition="ilt" role="Checklist">
<emphasis>...output omitted...</emphasis>
</task>
<task condition="role" role="Resequence">
<emphasis>...output omitted...</emphasis>
</task>
Important
condition="rolehtml" and not condition="role". Text marked with condition="role" appears in ROLE PDF files, which is not the desired result.
Important
condition="ilt, vt" in older content. You must update these to condition="ilt" because commas are not allowed in publican on RHEL 7.
Note
Chapter 9. Using ID Attributes
9.1. Using ID Attributes
id attribute. Use the following guidelines to create unique IDs. Remember that your build will either fail or produce warnings if any IDs are duplicated.
Creating a New Course
- <book id="sku-SG"> for student guide
- <book id="sku-IG"> for instructor guide
- <chapter id="shortchaptername">
- <section id="shortsectionname">This only applies to top-level sections. ID attributes on other section levels are only required if you need to link to them.
- <itemizedlist id="shortname"> (optional)
- <mediaobject id="topic-shortname">
- <co id="topic-id">
- <task id="topic-id">
- <qandaentry id="questionx">
- <callout id="calloutx">
Updating Existing Courses
Reusing Content in a New Course
Example 9.1. Example of Section ID Attribute
Example 9.2. Example of Task ID Attribute
Referencing Other Sections and Chapters
Supported tags are listed in <xref linkend="supported-yes" />.
Chapter 10. Other DocBook Elements
10.1. Using Subscripts, Superscripts, and Copyright and Trademark Symbols
<trademark class="registered">Linux</trademark>,
<trademark class="copyright">JBoss</trademark>,
<trademark>Java</trademark>,
e = mc<superscript>2</superscript>,
H<subscript>2</subscript>O
class attribute is trade. The rendering of various classes is shown below:
Note
10.2. Using Blockquotes
10.3. Using Email Addresses
<screen><email>samplemail@example.com</email></screen>
10.4. Quotation marks
<quote>Sample Quote</quote>
Chapter 11. Presentation Methods
11.1. Standard Lecture
11.1.1. Standard Lecture Example XML
<section><title>Introducing Package Documentation</title>

      <para>
        In addition to <code>man</code> and <code>pinfo</code>, developers may also choose to include documentation in their application's RPM distribution package.
        When the package is installed, files recognized as documentation are moved to <code>/usr/share/doc/<replaceable>packagename</replaceable></code>.
        Software package builders may include anything deemed helpful as a complement to, but not duplicating, <code>man</code> pages.
        GNU packages also use <code>/usr/share/doc</code> to supplement info nodes.
      </para>

      <para>
        Most packages include files describing package distribution licensing.
        Some packages include extensive PDF- or HTML-based documentation.
        Accordingly, a useful package browsing method is pointing a browser to <uri>file:///usr/share/doc</uri> and using a mouse.
      </para>

  <screen><prompt>[&stu;@&ex_dsk1; ~]$ </prompt> <code>firefox file:///usr/share/doc</code></screen>

      <para>
        Some packages come with extensive examples, configuration file templates, scripts, tutorials, or user guides.
        Browse <code>/usr/share/doc/vsftpd-*</code> as an example.
        Some documentation is sparse; the <package>zip</package> utility includes the compression algorithm used and little else.
        Other packages includes large user manuals or developer guides, or electronic copies of related, published books.
      </para>

      <note>
        <para>
          The kernel itself has a significant documentation package.
          The <package>kernel-doc</package> package is a treasure of kernel, driver, tuning, and advanced configuration information.
          Experienced system administrators regularly research <package>kernel-doc</package> files.
        </para>
      </note>

      <note role="References">
        <para>
          <code>hier</code>(7) man page <itemizedlist>
            <listitem>
              <para>
                Discusses the hierarchy of Linux directories, including <code>/usr/share/doc</code>.
              </para>
            </listitem>
          </itemizedlist>
        </para>
      </note>
</section>11.1.2. Standard Lecture Example Render
11.1.2.1. Introducing Package Documentation
man and pinfo, developers may also choose to include documentation in their application's RPM distribution package. When the package is installed, files recognized as documentation are moved to /usr/share/doc/packagename. Software package builders may include anything deemed helpful as a complement to, but not duplicating, man pages. GNU packages also use /usr/share/doc to supplement info nodes.
file:///usr/share/doc and using a mouse.
[student@desktop1 ~]$firefox file:///usr/share/doc
/usr/share/doc/vsftpd-* as an example. Some documentation is sparse; the zip utility includes the compression algorithm used and little else. Other packages includes large user manuals or developer guides, or electronic copies of related, published books.
Note
Note
hier(7) man page
- Discusses the hierarchy of Linux directories, including
/usr/share/doc.
Chapter 12. Engagement Methods
- 12.1. Usage Guidelines
- 12.2. Guided Exercise Overview and XML
- 12.3. Sample Guided Exercise
- 12.4. Guided Exercise - Multiple Tasks
- 12.5. Sample Guided Exercise with Multiple Tasks
- 12.6. Resequencing Quiz Overview and XML
- 12.7. Resequence Title
- 12.8. Matching Quiz Overview and XML
- 12.9. Matching Quiz Sample Title
- 12.10. Multiple-choice Overview and XML
- 12.11. Multiple-choice Sample Title
- 12.12. Lab Overview and XML
- 12.13. Creating Widgets with Microtools
- 12.14. Comprehensive Review Overview and XML
12.1. Usage Guidelines
- Every presentation section must be followed by a guided exercise section, which can be a guided exercise or quiz (matching, multiple-choice, or resequencing).
- Every chapter must end with a lab contained in its own section.
- Certification-based courses should end with a comprehensive review chapter.
Important
12.1.1. Title Conventions
Course Title
    Chapter One Content Title
         Section One Content Title
         Guided Exercise: [Section One Content Title] or Lab: [Section One Content Title] or Quiz: [Section One Content Title]
         Section Two Content Title
         Guided Exercise: [Section One Content Title] or Lab: [Section One Content Title] or Quiz: [Section One Content Title]
     Lab: [Chapter One Content Title]
Comprehensive Review12.1.2. Procedure
12.1.2.1. Steps
<procedure>
<para>
You must update the project first, and then create a new branch.
</para>
<step>
<para>
Change directory to your project folder.
</para>
<screen>
<![CDATA[
$ cd project.git
]]></screen>
</step>
12.1.3. Solution Usage
role="solution" to display. Use the following solution guidance depending on the type of engagement method:
- Guided Exercise: Guided exercises are at the end of a section and should include steps for the student to complete the assignment as well as detailed instructions on how to execute those steps, so no solution is needed.
- Quizzes: Quizzes always require solutions.
- Lab: A chapter lab is derived from the combined practices for all sections in a chapter and should include only the steps for the student to complete with no additional instructions. Whenever possible, build your end-of-chapter lab around an example, analogy, simulation, or case study that directly relates to the task being taught.
- Comprehensive Review: A review is at the end of a course and consists of situational task assignments without instructions, therefore solutions are required. Write an end-of-course comprehensive review to prove your student’s ability to solve a real-world problem using the solutions taught and practiced in the course.
Important
12.2. Guided Exercise Overview and XML
<section>
  <title>Guided Exercise: Sample Title</title>
<!-- Task should have id that is short version of topic -->
  <task role="Checklist" id="topic-practice">
    <title>Can't be empty, won't be used</title>
    <tasksummary>
      <para>
        In this lab, you will .....
      </para>

      <formalpara>
        <title>Outcomes</title>
        <para>
          List outcomes.
        </para>
      </formalpara>
    </tasksummary>
    <taskprerequisites>
      <para>
        List prerequisites.
      </para>
    </taskprerequisites>
<procedure>
   <title>Steps</title>
      <step>
        <para>
          Sample instructions, include solutions. We are holding hands here.
        </para>
        <substeps>
          <step>
            <para>
              Substep One
            </para>
          </step>
          <step>
            <para>
              Substep Two
            </para>
            <para>
              You can include output in <screen> elements. If you need to omit some output that is not relevant, use the format <emphasis>...output omitted...</emphasis>. Note: if this produces questionable output, consult with your scrum master and architect.
            </para>
<screen>The first part of the output.
<code>The important part of the output.</code>
The last part of the output. Everything after this is mostly irrelevant.
<emphasis>...output omitted...</emphasis>
          </step>
        </substeps>
      </step>
      <step>
        <para>
          More Sample instructions
        </para>
        <substeps>
          <step>
            <para>
              You don't have to use these substeps.
            </para>
          </step>
          <step>
            <para>
              Try to limit the number of substeps to six.
            </para>

          </step>
        </substeps>
      </step>
    </procedure>
    <taskrelated>
      <formalpara>
        <title>Finish</title>
        <para>
          On the <code>workstation</code> machine, use the <code>lab</code> command to complete this exercise.
          This is important to ensure that resources from previous exercises do not impact upcoming exercises.
        </para>
      </formalpara>
      <screen><prompt>[student@workstation ~]$ </prompt><userinput>lab chapter-topic finish</userinput></screen>
    </taskrelated>
  </task>
</section>
Important
12.3. Sample Guided Exercise
Must exist but is not used.
- Sample instructions, include solutions. We are holding hands here.
- Substep One
- Substep TwoYou can include command or other output in <screen> elements. If you need to omit some output that is not relevant, use the format <emphasis>...output omitted...</emphasis>. Note: if this produces questionable output, consult with your scrum master and architect.
The first part of the output.
The important part of the output.The last part of the output. Everything after this is mostly irrelevant. ...output omitted...
- More Sample instructions
- You can use substeps to clarify procedures.
- Avoid using more than six substeps. Do not use sub-substeps.
12.4. Guided Exercise - Multiple Tasks
- Use multiple <task> elements for each procedure needed. Ensure this element has a unique @id as well as @role='Checklist'.<tasksummary> and <taskprerequisites> are retained only in the first <task>. Even though these elements are only in the first task, the content provides coverage for all tasks in the GE.<taskrelated> is retained only in the second <task>. Even though this element isonly in the second task, the content provides coverage for all tasks in the GE.
12.5. Sample Guided Exercise with Multiple Tasks
student user on the workstation machine, use the lab command to prepare your system for this exercise.
[student@workstation ~]$lab chapter-topic start
Procedure 12.1. Part 1
- Sample instructions for Part 1
- Substep one.
- More sample instructions.
- You do not have to use these substeps.
- Limit substeps to six or fewer. Do not use sub-substeps.
12.6. Resequencing Quiz Overview and XML
<!-- Section should have id that is short version of title -->
<section id="shortsectionname-resequence">
  <title>Quiz: Resequence Title</title>
  <!-- Task should have id that is short version of topic -->
  <task role="Resequence" id="topic-resequence">
    <title>Can't be empty, won't be used</title>
    <!-- Modify the directions to describe your quiz and include "Indicate the order the steps should be taken." -->
    <tasksummary>
      <para> The steps to (fill in the blank) are shown below. Indicate the order the steps should
        be taken. </para>
      <para condition="rolehtml"> Drag and drop the items into the correct order. When you have
        completed ordering the items, click <guilabel>check</guilabel>. Your correct answers will
        have a blue background and your incorrect answers will be crossed out. If you wish to try
        again, click <guilabel>reset</guilabel>. Click <guilabel>show solution</guilabel> to see
        all of the correct answers. </para>
    </tasksummary>
    <procedure role="solution">
      <step role="2">
        <para> Sample step 2 </para>
      </step>
      <step role="6">
        <para> Sample step 6 </para>
      </step>
      <step role="4">
        <para> Sample step 4 </para>
      </step>
      <step role="3">
        <para> Sample step 3 </para>
      </step>
      <step role="1">
        <para> Sample step 1 </para>
      </step>
      <step role="7">
        <para> Sample step 7 </para>
      </step>
      <step role="5">
        <para> Sample step 5 </para>
      </step>
    </procedure>
  </task>
</section>
12.7. Resequence Title
Can't be empty, won't be used
- Sample step 2
- Sample step 6
- Sample step 4
- Sample step 3
- Sample step 1
- Sample step 7
- Sample step 5
12.8. Matching Quiz Overview and XML
- Additional columns (the table is not limited to two columns)
- Blanks from a different column
- Optional table headings
 <!-- Section should have id that is short version of title -->
<section id="shortsectionname-matching">
  <title>Quiz: Matching Quiz Sample Title</title>

  <!-- Task should have id that is short version of topic -->
  <task role="Matching" id="topic-matching">
    <title>Titles are still mandatory, but replaced by the stylesheet</title>
    <tasksummary>
      <para> Match the items below to their counterparts in the table. </para>
      <para condition="rolehtml"> Drag and drop the items to the cell next to the correct answer. Each cell should contain one answer. If you want to change an answer, either drag it to another location, or click <guilabel>reset</guilabel> to return the quiz to its original settings. </para>
      <para condition="rolehtml"> When you have completed the quiz, click <guilabel>check</guilabel>. Your correct answers will have a blue background and your incorrect answers will be crossed out. If you want to try again, click <guilabel>reset</guilabel>. Note: If you have trouble getting the quiz to function a second time, try refreshing your browser. Click <guilabel>show solution</guilabel> to see all of the correct answers. </para>
</tasksummary><procedure>
<step>
<informaltable frame="all">
<tgroup cols="2">
<colspec colname="c1" colnum="1" colwidth="1.0*"/>
<colspec colname="c2" colnum="2" colwidth="2.0*"/>
<thead>
<row>
<entry>Project</entry>
<entry>Technology</entry>
</row>
</thead>
<tbody>
<row>
<entry> Red Hat </entry>
<entry role="solution"> Ansible </entry>
</row>
<row>
<entry> GNU </entry>
<entry role="solution"> libc </entry>
</row>
<row>
<entry> KDE </entry>
<entry role="solution"> Plasma </entry>
</row>
<row>
<entry> Mozilla </entry>
<entry role="solution"> Firefox </entry>
</row>
<row>
<entry> FreeDesktop.org </entry>
<entry role="solution"> colord </entry>
</row>
<row>
<entry> OpenBSD </entry>
<entry role="solution"> OpenSSH </entry>
</row>
</tbody>
</tgroup>
</informaltable>
</step>
</procedure>
</task>
</section>12.9. Matching Quiz Sample Title
Titles are still mandatory, but replaced by the style sheet
Project Technology Red Hat Ansible GNU libc KDE Plasma Mozilla Firefox FreeDesktop.org colord OpenBSD OpenSSH
12.10. Multiple-choice Overview and XML
Note
- Single correct response
- Multiple correct responses
- Includes an exhibit
<!-- Section should have id that is short version of title -->
<section id="shortsectionname-multchoice">
<title>Quiz: Multiple-choice Sample Title</title>

<!-- Tasks should have an id that is a short version of the topic -->
<task role="MultChoice" id="topic-multchoice">
    <title>will not show</title>
    <tasksummary>
        <para> Choose the correct answer to the following questions: </para>
        <!--  <para condition="role"> When you have completed the quiz, click <guilabel>check</guilabel>. If you want to try again, click <guilabel>reset</guilabel>. Click <guilabel>show solution</guilabel> to see all of the correct answers. </para>-->
    </tasksummary>
<procedure>
<step>
    <qandaset>
    <!--  Question with one correct answer-->
        <qandaentry role="multi-radio" id="questionx">
        <!-- Question should have id that is short version of topic -->
            <question>
                <para>
                    The designer needs to limit the chart display to the set of products that contribute 20 percent of the total sales using the top contributors.
                </para>
            </question>
            <answer>
                <para>
                    Show only values that are Greater Than or Equal To 20 percent and select the Show Total checkbox.
                </para>
            </answer>
            <answer>
                <para>
                    Show only First 20 Values, select the Global Grouping Mode checkbox, and select the Exclude Others checkbox.
                </para>
            </answer>
            <answer role="solution">
                <para>
                    Show only values that accumulate to 20 percent and Use Largest Values and select the Check Include Boundary Values checkbox.
                </para>
            </answer>
            <answer>
                <para>
                    Show only Largest 20 Values and select the Show Others checkbox.
                </para>
            </answer>
        </qandaentry>
    </qandaset>
</step><!-- Question with more than one correct answer. Indicate how many choices at end of question.-->
<step>
<qandaset>
<qandaentry role="multi-check" id="questiony">
<question>
<para>
Based on the Linux partition naming system, which of the following two device names point to "logical" partitions (assuming the corresponding partitions exist at all on the system in question)? (Choose two.)
</para>
</question>
<answer>
<para> /dev/sda3 </para>
</answer>
<answer>
<para> /dev/fd0 </para>
</answer>
<answer role="solution">
<para> /dev/hdb7 </para>
</answer>
<answer>
<para> /dev/hda4 </para>
</answer>
<answer>
<para> /dev/fd7 </para>
</answer>
<answer role="solution">
<para> /dev/sdc11 </para>
</answer>
</qandaentry>
</qandaset>
</step><step>
<qandaset>
<qandaentry role="multi-check" id="questionz">
<question>
<para>
<screen>Name Null? Type
---------- ------- --------
STUDENT_ID NOT NULL VARCHAR2(4)
STUDENT_NAME VARCHAR2(25)
SUBJECT1 NUMBER(3)
SUBJECT2 NUMBER(3)
SUBJECT3 NUMBER(3)</screen>
</para>
<para> Given the structure of the MARKS table in the above Exhibit, which two
statements would execute successfully? (Choose two.) </para>
</question>
<answer>
<para> SELECT student_name, subject1 FROM marks WHERE subject1 > AVG(subject1);
</para>
</answer>
<answer>
<para> SELECT student_name, SUM(subject1) FROM marks WHERE student_name LIKE ‘R%’;
</para>
</answer>
<answer role="solution">
<para> SELECT SUM (subject1+subject2+subject3) FROM marks WHERE student_name is
NULL; </para>
</answer>
<answer role="solution">
<para> SELECT SUM (DISTINCT NVL(subject1,0)), MAX(subject1) FROM marks WHERE
subject1 > subject2; </para>
</answer>
</qandaentry>
</qandaset>
</step>
</procedure>
</task>
</section>Important
12.11. Multiple-choice Sample Title
won't show
- Q:The designer needs to limit the chart display to the set of products that contribute 20 percent of the total sales using the top contributors.A:Show only values that are Greater Than or Equal To 20 percent and select the Show Total checkbox.A:Show only First 20 Values, select the Global Grouping Mode checkbox, and select the Exclude Others checkbox.A:Show only values that accumulate to 20 percent and Use Largest Values and select the Check Include Boundary Values checkbox.A:Show only Largest 20 Values and select the Show Others checkbox.
- Q:
Name           Null?       Type
  ----------    -------      --------
  STUDENT_ID    NOT NULL  VARCHAR2(4)
  STUDENT_NAME          VARCHAR2(25)
  SUBJECT1            NUMBER(3)
  SUBJECT2            NUMBER(3)
  SUBJECT3            NUMBER(3)
Given the structure of the MARKS table in the above Exhibit, which two statements would execute successfully? (Choose two.)A:SELECT student_name, subject1 FROM marks WHERE subject1 > AVG(subject1);A:SELECT student_name, SUM(subject1) FROM marks WHERE student_name LIKE ‘R%’;A:SELECT SUM (subject1+subject2+subject3) FROM marks WHERE student_name is NULL;A:SELECT SUM (DISTINCT NVL(subject1,0)), MAX(subject1) FROM marks WHERE subject1 > subject2;
12.12. Lab Overview and XML
<!-- Section should have id that is short version of title -->
<section role="Test" id="shortsectionname-lab">
  <title>Lab: Creating Widgets wth Microtools</title>
  <!-- Task should have id that is short version of topic -->
  <task role="Lab" id="topic-lab">
    <title>Can't be empty, will be ignored</title>
    <tasksummary>
      <para>In this lab, you will .....</para>
      <formalpara>
        <title>Outcomes</title>
       <para>You should be able to...xxx</para>
<!--Outcomes tell students what they will be able to do after completing a guided lab, lab, or an instructor-led lab.-->
      </formalpara>
    </tasksummary>
    <taskprerequisites>
      <para>Sample prerequisites</para>
      </taskprerequisites>
<procedure>
   <title>Steps</title>
      <step>
        <para> General instruction </para>
        <para role="solution"> Sample solution </para>
      </step>
      <step>
        <para> More objective </para>
        <para role="solution"> Sample solution </para>
      </step>
</procedure>
    <taskrelated>
      <formalpara>
        <title>Evaluation</title>
        <para>
          As the <code>student</code> user on the <code>workstation</code> machine, use the <code>lab</code> command to grade your work.
          Correct any reported failures and rerun the command until successful.
        </para>
      </formalpara>
      <screen><prompt>[student@workstation ~]$ </prompt><userinput>lab chapter-topic grade</userinput></screen>

      <formalpara>
        <title>Finish</title>
        <para>
          As the <code>student</code> user on the <code>workstation</code> machine, use the <code>lab</code> command to complete this exercise.
          This is important to ensure that resources from previous exercises do not impact upcoming exercises.
        </para>
      </formalpara>
      <screen><prompt>[student@workstation ~]$ </prompt><userinput>lab chapter-topic finish</userinput></screen>
    </taskrelated>
  </task>
</section>
12.13. Creating Widgets with Microtools
Can't be empty, will be ignored
- General instructionSample solution
- More objectiveSample solution
12.14. Comprehensive Review Overview and XML
Index
A
- application, Application Names
B
- blockquote , Using Blockquotes
- bold, Emphasizing Text
C
- callout, Using Callouts and Callout Lists
- config , Describing Sets of Data
- Content reuse , Using ID Attributes
- Course updates , Using ID Attributes
E
- email , Using Email Addresses
- emphasis, Emphasizing Text
G
H
- hash, Identifying System Output
- hyperlink, URI and URL
I
- italic, Emphasizing Text
L
- line breaks, Identifying System Output, Using Other Operating Systems
- line wrap, Identifying System Output, Using Other Operating Systems
- link, URI and URL
- long lines, Identifying System Output, Using Other Operating Systems
M
- Microsoft Windows, Using Other Operating Systems
N
- ncurses , Comparing Graphical, Terminal, and Browser-based User Interfaces
- non-Linux, Using Other Operating Systems
- non-POSIX, Using Other Operating Systems
P
- product, Product Names
- productname, Product Names
- project name, Application Names
Q
- quotes
- quotation marks , Quotation marks
R
- remote login, Recommended Practices for Remote Logins
- root login, Recommended Practices for Remote Logins
S
- security
- remote login, Recommended Practices for Remote Logins
- SHAsum, Identifying System Output
- shell script (as an executable command), Code
- SKU , Using ID Attributes
- special characters , Using Subscripts, Superscripts, and Copyright and Trademark Symbols
- subscript , Using Subscripts, Superscripts, and Copyright and Trademark Symbols
- superscript , Using Subscripts, Superscripts, and Copyright and Trademark Symbols
- system output, Identifying System Output
T
U
W
X
- Xref , Using ID Attributes
Y
- yaml , Configuration Files